Sprouting should be an important part in any parrots diet. It's full of vitamins that birds need on a daily basis. Sprouts are of the highest nutrition, they promote self healing and excellent feather quality as well as improves their behaviours. Sprouts are a rich source of vitamin A (beta carotene), C, E, B and antioxidants. Oats contain large amounts of vitamin C, increasing by 600%, thiamine, riboflavin, pantothenic, all increase after sprouting. Sprouts are 10 to 100% higher in enzymes than fruit and veggies. Enzymes are vital for sustaining life and are essential for digestion brain proper brain function.


You can soak your mixes in 100% natural juice for extra flavour and vitamins in their diet. My birds enjoy 100% natural carrot juice for the beta carotene and vitamin A or 100% natural berry Juice is another popular juice for Eclectus owners.

You can also add to cut fresh herb, chilli, lime/lemon rind grated, aloe vera leaf, grated ginger, lemon grass, dandelion, pepitas or anything else your birds like enjoy for flavour, as well as flowers and small foliage of safe plants
These should only be added as you serve the sprouts. Some of these things added to the sprout mix in the fridge may cause the sprouts to spoil quickly.
Almonds (or any other nut, excludes peanuts)
Fennel
dill
Mustard - yellow or red (black mustard is a very hard seed & many people are unsuccessful at sprouting them.
Fenugreek
Chick peas
Caraway
Adzuki beans
Alfalfa
Amaranth
Barley
Buckwheat
Quinoa
Oat
Wheat
Maize
Linseed
Parsley
Lettuce
Thistle
Coriander (needs to be lightly rubbed to split the case open)
Garbanzo beans
Millet
Oats
Almonds
Cabbage
Corn
Sesame
Sunflower -sprout unsalted & in the shell. They develop a bitter taste if allowed to sprout too long so only sprout short.
Split peas
Lentils
Dried peas
Soybean (bean sprouts)
Rice
Broccoli
Cabbage
Kamut
Lemon Grass
Cress
Radish
Pumpkin
Pepitas (do sprout. Most people are unsuccessful because they split. Use cool water for soaking to avoid splitting)
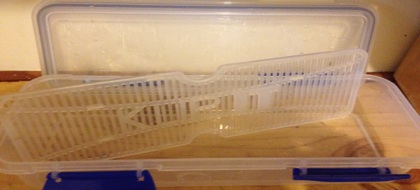
Container for storing sprouts. Grate at the bottom and the lid has hole drilled in for breathing. Containers like this can be bought at any supermarket.
Falafel
This is just a few things that can be sprouted
Sprouts
Sprout List
A Super Food


Which ever technique you choose to sprout you should always use fresh sprouting mixes. Old, stale mixes don't sprout and can often cause other mixes to spoil. If you pick a shop bought seed mixes it may not always be fresh. You will also need to check it for anything added other than seed such as dried fruit and nuts. These will need to be removed otherwise they will spoil the mixes quickly. There are plenty of fresh food places and health food and whole food shops that supply a large variety of sprouts and sprouting mixes in bulk, and some are organic.
Clean and sterilise sprouting jars. After each sprout mix they should be scrubbed, disinfected and allowed to dry properly. You can use vinegar, lemon juice and bicab of soda (baking soda) or Citrus Seed Extract (GSE) to sterilise.
Some people mix all their seed and mixes of various sizes in the one sprouting jar without any problems. Smaller mixes usually soak and sprout faster than some larger ones. So your small mixes will be ready for your birds to eat but the larger ones may not be. Once mixed in the one jar they're impossible to separate. It is recommended you keep the same size together and this may mean using 2 or 3 jars.
If you have separated the large from the small sprout mixes, you can start soaking larger mixes a few hours before the smaller ones or soak in warmer water than the smaller mixes so they will all be ready around the same time. To speed up any soaking and sprouting you can also soak all sprout mixes in warm water. Warm water speeds the process of soaking and sprouting and doesn't harm or kill them.
Your climate can also have an impact on the success of failure of your sprouting. I live in Perth, Western Australia and we're in a sub tropical climate. We can get very warm and humid. This weather can be an advantage to sprouting as this sort of weather speeds up the process. But if you’re not careful and thorough enough it can be a disadvantage as sprouts do go off very quickly in this sort of weather.
Before soaking for the first time you need to give your sprout mixes a thorough rinse in clean water until the water runs clear. Add a few drops of Citrus Seed Extract (GSE) to your mix. Place at least double the amount of warm water in the jar as you have sprouting mix. This will allow the sprout to expand when soaking with water and double in size. Don’t allow your mix to dry up. If you didn’t put enough water in just top it up. You should keep your sprouts in room temperature and away from direct sunlight in hot weather. Each kitchen can also be different for positioning sprouting mixes and you need to find the spot in your kitchen where your sprouts are the most successful. Rinse as often as you possibly can through both the soaking and sprouting process. The warmer the weather is, the more you may need to rinse your sprouts to avoid them going off.
The soaking time will vary. The warmer your climate, the quicker they will soak and sprout. In warmer climates you can soak 4 - 6 hours, sometimes as little at 3 hours. In cooler climates the soaking time will take longer. You should not allow your mixes to soak longer than 12 hours. Most people find it easier just to soak over night.
Smell your mix with each rinse you give. Smelling the mixes will tell you what state the sprouts are in, if they're still good or have gone off. Sprouting mixes can go bad through any soaking, rinse or sprouting stage so it is important to keep smelling them. If your mixes smell nutty, pleasant or appear to have no smell they are OK. If they smell sour or bad in any way to you they should be thrown out and you will have to start again.
Once your mixes are are soaked and swelled to double the size, rinse them thoroughly until the water runs clear and allow them to drain. You should place your jar in a position where the water can drain freely out of the jar. You need to continue rinsing and draining as often as possible. The sprouting time will vary from a few hours to 2-3 days. If you don't see any shoots starting to form on your sprouts after 2 days they may not shoot. This can be an indication the mix is old.
You should be able to see tiny shoots forming. Allow for 2 to 3 days of sprouting (after soaking). 2 to 3 days allows your sprouts to grow to it best nutritional value. After this time do a final rinse, drain and refrigerate. If you allow the shoots to sprout longer the nutritional value may start to change. Once they're placed in the fridge they will continue to grow but the cold will slow the process right down. You can keep the sprouts in the jar, placed in a container upside down so the water can still drain freely. Or you can buy a plastic container with a grate at the bottom. These are usually available at most super markets. The grate allows the sprouts to be elevated from the drained excess water, leaving them fresh for longer. Sprouts sitting in drained water can spoil immediately. The container will need to have holes in the lid for breathing. Sprouts are a living food so need to be able to breathe so drill plenty of holes in the lid to allow for this. Properly stored sprouts can last up to a week. The normal time frame for keeping them is about 4-5 days. Sprouts should not be kept past 7 days no matter how fresh they might look or smell.
There area a number of ways you can successfully sprout. You should google various ways of sprouting to try and find which technique works best for you. This is one way (out of two ways) I sprout.
There are many sprouting kits, jars and products available today, or you can make your own. Before you go out and buy the most expensive sprouting equipment you should first try sprouting and getting the technique that works best for you.
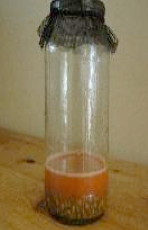
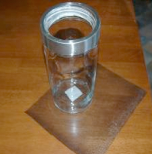
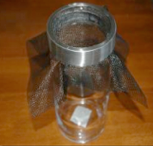
You can turn any jar into a sprout jar. All you need is a jar with or without a screw top lid. If you have one with a screw top lid (picture below), cut the top of the lid out so all that's left is screw piece that screws onto the jar. Get hold of some fly screen mesh. The screw top lid will keep the mesh in place while you rinse so you don't need to worry about it coming off and losing sprouting mixes. Alternatively you can you can place a lacky band around the mesh to hold it in place on the jar. The lacky band around the jar is the most convenient and easiest way to start.

